Wednesday, August 31, 2011

Did someone scream for Ice Cream?!


This has been a pretty busy week and it's been difficult to fit everything in, even baking, which is what I'd prefer to be doing. I made some ice cream cone cut-out cookies and spent two days icing them in stages when I could squeeze it in. My friend Amy gave me an ice cream cone cookie cutter as a gift and I was excited to try it out! It took me some time finally use it because I can get so intimidated trying new designs and things outside my comfort zone. I finally gave it a go, and I'm happy with the results. As always, I have ideas how to tweak the cone and designs for the ice cream....a whole world of possibilities! If you have any suggestions on colors or combinations I can try, leave them in the comments below. I'd love to hear what you think!


Friday, August 26, 2011

Cosmos and Cakes, Oh My!

Buttermilk Pudding Cakes
Cocktails anyone?
So, Long Island is in hurricane preparedness mode. I did all my shopping yesterday for essentials so I could get back to baking today. Whether Irene stops by or not, I have orders for the weekend! Armed with water, batteries, candles and Spaghetti O's, I'm free to bake easy. :)


My friend is hosting a bachelorette party this weekend for her soon to be sister-in-law and she asked me to make some cosmopolitan cookies for the girls. I love making these and was happy to do it! Iced sugar cookies are a multi-step process. For instance, with these cookies, mixing, cutting and baking are the first steps. The truly time consuming part was waiting for the white outline to dry before I was able to add the pink....and then waiting for the pink to dry before adding the sanding sugar...and then waiting for the entire cookie to set well enough to bag it without the icing smearing. It can be a bit tedious, but I do love it!!


Here is the finished product:


I hope everyone enjoys them!


During the waiting parts of creating these cookies, I decided to try a recipe for Buttermilk Pudding Cakes I came across awhile ago. It looked SO easy and quick; something you can whip up on short notice with no mess or fuss. I wanted to see if this was true. I'm happy to say it was - In practically no time at all I had 8 perfect little cakes! AND, I did not use a mixer for any part of the recipe (even the whipped cream)...a whisk is all you need!


Here is what you need to make these cakes:


Nearly all of the ingredients, except perhaps buttermilk, are most likely ones you already have on hand, which is another great thing about this recipe.


Here you can find the the directions as posted on Martha's site:


Buttermilk Pudding Cakes
Recipe by Matt and Ted Lee

3/4 cup sifted all-purpose flour
1 1/2 teaspoons baking powder
2 large eggs
3/4 cup whole or low-fat buttermilk
1 teaspoon pure vanilla extract
5 tablespoons plus 1 teaspoon sugar
4 tablespoons (1/2 stick) unsalted butter, melted and cooled to room temperature (I only had salter butter, and it turned out just fine)
Nonstick cooking spray

Preheat your oven to 425 degrees with the rack placed on the top third of the oven.

Sift together the flour and baking powder and set aside. In another bowl whisk eggs until they are creamy and yellow. Add buttermilk, vanilla, sugar and butter (the mixture should look curdled and broken). Add the dry ingredients and whisk until your batter is smooth and everything is incorporated.

Spray 8 standard size muffin pan cups (nonstick) with nonstick cooking spray. Pour the batter into each cup about two-thirds full.


Bake for about 9 minutes. Check to see if all sides of the cakes are evenly browned by using a knife tip between the rim of the cake and muffin cup. Pull the cake gently to check the color. If the cakes are not evenly browned they will not hold together. If they are not completely browned at 9 minutes, continue baking in 1 minute increments until the cakes are evenly browned.

After removing the cakes from the oven, invert them onto individual plates. Serve with berries and whipped cream if desired.

These cakes do have a nice pudding-like texture and a fruit/whipped cream topping matches perfectly. I warmed up a bit of the blueberry syrup I had left over from my blueberry cupcakes...very tasty! Finally, I whisked up some heavy whipping cream, sugar, and a bit of vanilla to finish off this lovely dessert. When I'm short on time and want to make a little dessert for guests, this will be my go-to!


Wednesday, August 24, 2011

Super Simple Stenciled Sugar Cookies


I had to mix and bake a ton of cutout cookies today, and knew I would not be able to ice them in time to post something for today, so I saved a couple of circle cutouts to try a stencil method I read about. A few weeks ago I purchased some baking stencils, so I had them ready to go!

I began by using some of the sugar cookie dough I mixed up. Then, I rolled it out and cut the shapes.


Once I had a few circles on a cookie sheet, I assembled the necessary items for the design: some stencils, a paint brush, and cocoa powder (any type of edible colored powder will do. I can't wait to experiment with colors!). You can purchase food powder at craft or baking supply stores. Even though it's nowhere near St. Patrick's Day, I bought some celtic stencils. As my friend Maeve says, I'm Irish everyday and I don't need only one day a year to celebrate it. :)


Center the stencil design on your cookie and press it firmly down. Be firm enough to make it stick, but do not press too hard or you will make dents in the cookie. Once you have the stencil in place, pour some of the edible powdery substance you chose, and begin to brush it on the cookie.


Once the entire area of the design has been brushed, CAREFULLY lift the stencil off of the cookie.


Bake the cookie as directed, and you will have a delicious cookie with a beautiful, professional looking design baked in. Enjoy!


Tuesday, August 23, 2011

How much blueberry is too much blueberry?


Well, unless you are Violet Beauregarde, I personally, don't think there is such thing as too much! On that note, I had a few pints of blueberries I purchased from a Farmer's Market and wanted to find something fun and delicious to do with them. I decided on blueberry cake with blueberry filling topped with blueberry buttercream icing.

First I mixed up some vanilla cake batter. Next, I added the blueberries to the batter, but not before coating them in flour.


Doing so prevents the berries from sinking while baking. Without the flour coating, they sink to the bottom of the cake. Once you have added the coated berries, FOLD into the batter mixture. If you stir too vigorously the berries can burst and their juice will turn your batter purple.


After the berries are fully incorporated, spoon the batter into cupcake liners placed in a cupcake pan. Bake as directed for the cake recipe you have chosen.


Next, I made what was supposed to be blueberry filling for the cupcakes. I followed a recipe that made an absolutely delicious blueberry SYRUP, but did not gel as promised into a filling consistency. As a result, I could not inject it into the cupcakes for a "surprise inside". I will try to make filling again tomorrow, after purchasing more blueberries, as I used up my supply today.


So, onto the buttercream icing. Instead of milk I added some of the blueberry syrup to the mixture. I thought this would produce a lovely blueberry taste, but neither my husband nor I thought the berry taste stood out. However, it turned the buttercream into a beautiful purple color, which I loved. After frosting the cupcakes, I spooned a bit of the blueberry syrup on top to finish the look. I am hoping it will set nicely and not create a liquidy, sticky mess. So far, so good.


Even though this project didn't turn out as I originally planned, the cupcakes are DELICIOUS with an incredible blueberry taste!! I hope if you try them you enjoy them, too.


If you are interested in a wonderful blueberry syrup (great for pancakes, ice cream topping, crepes, etc.), you can find the recipe here.  Next time I make this syrup I'm going to add some Blueberry Port Wine. Mmmm.....


Saturday, August 20, 2011

Peanut Butter Kiss Cookies: Prettier in Pink!


I wanted to make something simple and fun after the golf course, so I chose these adorable cookies. I first saw these cookies here: http://dailynibbles.com/2011/02/01/in-the-kitchen-pink-peanut-butter-hugs/, and immediately fell in love. Pink is my favorite color, they mimic the hot pink/zebra combination that is so popular right now, and they just make me smile. Turns out, as is often the case with baking something for the first time, it wasn't so easy! Coloring these correctly took a few tries...3 batches of dough later I was finally pleased with the result.

To make these cookie you will need the following things:


Your favorite Peanut Butter Cookie recipe, pink sanding sugar, Hershey Hugs, neon pink gel food coloring, and red gel food coloring (optional). I have a Peanut Butter Cookie recipe I have been following forever and I love it so much I would hesitate to even think about using another one. Here it is:

Peanut Butter Cookies (adapted from Betty Crocker's Cookbook)

1/2 cup granulated sugar
1/2 cup brown sugar
1/2 cup peanut butter (I prefer Reese's Peanut Butter)
1/4 cup shortening (I prefer Crisco baking sticks, butter flavor)
1/4 cup butter, softened
2 tablespoons milk
1 egg
1 1/4 cups all purpose flour
3/4 teaspoon baking soda
1/2 teaspoon baking powder

Cream together the butter, shortening, and peanut butter. Mix in sugars, egg and milk. Add the remaining ingredients. Preheat oven to 375 degrees. Roll the dough into 1 1/2 - 2 inch balls and place on an ungreased cookie sheet at least three inches apart. Using a fork make a crisscross pattern by pressing down on the cookie. Dip the fork in flour between cookies to prevent the dough from sticking. Bake between 9-10 minutes. Let cookies cool several minutes before removing them from cookie sheet.

Since I was making pink cookies, I added a few drops of AmeriColor's Christmas Red gel food dye. I read this would make a terrific shade of hot pink. I used a hand mixer to incorporate the color; doing it by hand proved to be impossible for me, I am not strong enough to evenly mix it completely.

I had some issues with coloring the dough, which I will explain in a moment. Once the desired color is mixed into the dough, roll it into 1 1/2 - 2 inch balls, dredge through pink sugar until fully coated, and bake:


After the cookies are finished baking, immediately place a Hershey Hug in the middle of the cookie, pressing it down about 1/2 way. The Hug will keep it's shape as long as it's not touched (the chocolate will half melt from the heat of the cookie). Once the cookie and the chocolate cool completely, the Hug will become solid again and the cookies can be packaged or placed in an airtight container to store.


Voila! Adorable hot pink zebra strip peanut butter cookies! Now, let's go over coloring the dough.

For the first batch I mixed up, I didn't think it was possible for it to turn pink with only a few drops of Christmas red, so I added some neon pink. I baked them and was not pleased. So, I mixed up another batch and mixed in the neon pink, still was skeptical of how they would look baked, panicked and added some red. This was close, much better, but still too dark for my taste. After thinking about it, and not ready to give up, I decided to mix up a third batch of dough and split it in two. In one half I mixed in only Christmas red dye. In the other half, I mixed in only neon pink. Here are the results of all four trials:

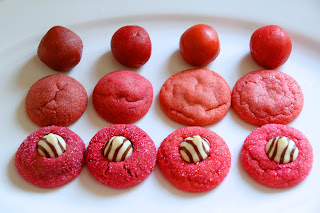
From Top to bottom: Uncooked dough, baked cookie with no sugar, finished cookie with sugar and hug.
The first column is the mostly red dye with some neon pink added. The second column is mostly neon pink with some red added. The third column is red dye only, and the fourth neon pink only. I had to use my judgement on how much dye to add. I was almost ready to stop at my second attempt (second column), but I'm happy I experimented with only using one color. Here is a close-up of column two and column four finished cookies, the two I decided were closest shade of the hot pink I was trying to achieve:

Cookie on left is neon pink and red dye, cookie on right is neon pink dye only.
The cookie on the left had a bit too much of a red hue and in certain light did not appear pink enough. So, the cookie on the right is the winner! I mixed approximately 6 drops of food coloring in one batch of cookie dough. I may add a bit more to darken the pink a bit, but three batches of cookies later I finally achieved my goal and I'm happy!


Thursday, August 18, 2011

A Hole In One?


Yesterday's project was a bit more involved than anything I've attempted so far. While browsing the web for ideas, I came across this "golf-scape" idea. Coincidentally, my Husband's partner is celebrating his birthday today and he is an avid golfer. Perfect opportunity to give this a try!

This was my inspiration:

Image used is from Cutest Food found at

As I started, I thought I might like the end result better if I filled in the gaps between cupcakes for a better golf course effect. I baked Vanilla cupcakes, let them cool, placed them in a transportable container, and set to work.

After mixing the buttercream icing, I used green gel dye to begin the grassy area. The day before, I practiced make the rough grass effect with a piping bag. I used leftover canned icing from the Panda cupcakes and was pleased with how it looked. From that practice session, I was not concerned with the process of piping the rough grass other than how long it might take. Ah, but this is where baking becomes a fickle art and can throw an unexpected curve into your plans!

The buttercream icing I favor is not nearly the same thickness as canned icing. Had I more time, I'm sure I could have come up with the necessary consistency required to pipe rough grass. Waiting until the 11th hour made me a victim of overconfidence, my friends! I was simultaneously baking rainbow cupcakes for my Husband's secretary's birthday, as well, and thought I had it all under control. Turns out, maybe not!

As it became late in the day, I had to settle for the rough grass design below (at no point did canned frosting become an option. I would rather sacrifice appearance than taste):

I wasn't thrilled with it, but my Husband loved and it and it's for his friend, so if he's happy I'm happy enough!
For the dark, trimmed grass area, I iced the cupcakes green and then covered them in dark green sugar to provide a contrast from the rough. For the sandbunker, I iced the cupcakes in white and covered them in light brown sugar. Next time, I will use crushed Nilla Wafers, as I think the sweetness factor of sugar on icing might be a bit much! I used a semi-sweet chocolate chip for the hole, and a mini-chip covered in white icing for the ball to create a hole-in-one. The flag is a toothpick with a taped triangular cut of paper. HB is for Happy Birthday!

On my next attempt I will perfect this type of grass icing:

Image shown from Delicious Dishings found at

Okay, so what have I learned?
-Master the grass method with the intended icing for use, not a substitute, which may provide false results!
-Next time a little more rough and a bit less sand bunker.
-It's REALLY not ideal to take photos at night. I don't know enough about using flash to compensate for the low light without bleaching out the objects. Photographing food is NOT easy!!
-This particular cupcake scheme does not look so great in a foil transporter, better to use a pastry box or arrange it on a flat board of some kind.
-This is a fun design you can really be creative with. Look at these clever creations!


Image from Cupcake Crafts at 

So, lessons have been learned and the cupcakes are on their way to celebrate! I don't think this was a hole-in-one finished product, but since it was my first time I'll give myself a 1-2 over par. :) ** I have since made this golf course again with much better results.  Click here to see!!**


Tuesday, August 16, 2011

What is black, white, and the cutest creature on the planet?


PANDAS!!

I think these little guys are adorable, and they are very easy to make. To assemble them you will need:


Cupcakes, white icing, black icing, Oreo minis, and mini chocolate chips. I really do NOT like to use store bought icing, however, while experimenting with different designs I am using it for convenience sake.

I think the way to put the panda cupcake together is pretty evident in the photos, but if you have any questions, please let me know and I'll be glad to help out!  Now I'm just waiting for someone to host a Panda themed party so I can make these again!


Monday, August 15, 2011

Hot off the Grill - Um, I mean fresh out of the oven :)

Brownie Burgers with Cupcake Buns!
Once again, I am late in posting from last Friday. My husband was very sick all weekend and it kind of threw me off of my new routine. I did manage to bake something, but was not able to post about it. I must become more proficient with my time management if I'm going to do this.

Anyway, last Friday I made the cutest Cupcake Brownie Burgers! I've seen them on the web many times while browsing for cupcake inspiration, but never had the courage to try them. Despite seeming like they'd be difficult, it was relatively easy once I got the hang of it! However, it's quite a time consuming project.

So creative I wish I'd thought of it!
As for today's project, I will photograph and post about it tomorrow. In the meantime, I will tell you they consist of cupcakes, black and white icing, Oreo Minis, and mini chocolate chips. Can you guess what they are?!

Friday, August 12, 2011

What's at the end of the Rainbow Cupcake experiment?


I am a day late in posting yesterday's baking project.  I decided to try Rainbow Cupcakes, which looked incredibly easy to do based on tutorials I've read and watched.  My experience, however, was a little different!  As a result, I ran out of daylight to photograph the last steps.  I am challenged in finding an appropriate spot in my house to take pictures of my baking processes...a place with enough natural light and bright background.  I've yet to come up with something, but I'll figure it out.  For now, the photos may not be ideal, but they get the idea across.  Okay, onto Rainbow Cupcakes:

Begin by mixing up your favorite white cake recipe (one blog suggested using a yellow cake to create more intense colors, but I did not go that route and cannot vouch for it).  You will need to divide the batter into equal amounts of however many colors you will be using.  I decided to use red, orange, yellow, green, blue and purple.  I then ladled the batter into six plastic cups.


Once the cups were filled, I used McCormick Egg and Food Dye to color the batter.  Many of the recipes I resourced used gel dye, but I didn't have the right colors.  Next time, I will try the gel to see if there's a difference.


Once you have mixed the batter with dye to your desired hue, add cupcake liners to your pan.  Now it's time to layer the batter.  I followed the ROYGBIV scheme, beginning with red, and added a spoonful to each liner.  Next, I put a spoonful of orange on top of the red, repeating the process until all six colors are layered in each liner. After two layers, it became apparent to me that I was spooning too much of each color into the liners.  I kind of had to keep going once I started, since, unlike a solid color batter, it's not possible to spoon "just a bit" out.  Doing that would blend the batter, rather than layering it, and would not result in the rainbow effect I was going for.  By the time I came around to the purple, there was only room in the liner for a dollop.  At this point I knew, once baked, the tops would be overflowing and not very pretty, but this is a learning process! 


And I was right!  Here they are out of the oven, overflowing tops and all!  I let them cool for an hour, and decided to attempt the rainbow icing method.  I am not very experienced in the art of using icing tips or pastry bags to frost cakes and cupcakes, so I did not know what to expect for the final product.

  
If you spotted this in the woods perhaps it would be mistaken for a mushroom...but I assure you it's safe to eat!
First I mixed up my favorite Buttercream Recipe, shared with me by my dear friend Amy.  Next, I assembled the materials for piping:  piping bag, a coupler and large star tip, small paintbrush, and gel coloring.


Fold the piping bag down half way.  Using the paint brush, paint a 1/2 inch strip of color inside the bag.  Repeat for each color.  Once the painting is done, spoon white icing into bag, unfold the bag, and begin piping.


The first thing I note to myself is the "paint job".  The gel did not adhere to the plastic piping bag the way I've observed in tutorials (using parchment paper piping method...too advanced for me at this stage!), which did did not bode well for me.  Here is the look I was going for:

Image copied from "Rainbow Cupcakes by Anastasia on Cake Central" at 

This is what happened:


Not quite the same!  The colors did not blend into the white buttercream as it should have.  So, what have I learned? 
-Pace myself when filling cupcakes liners - be careful not to overflow!
-Experiment with parchment paper as a piping bag for solid strips when icing OR
-Rather than striping the pastry bag, add previously colored icing (several colors) into a bag at the same time.
-These are really fun, cute and worth perfecting.  I will be baking Rainbow Cupcakes again!!

UPDATE:  I made rainbow cupcakes again using a new icing technique.  Click here to see how well it worked!!