Showing posts with label red velvet. Show all posts

Wednesday, June 6, 2012

Let's Play Ball For Father's Day! - Red Velvet Baseball Cupcakes


I've made many orders of cupcakes the last few weeks, but they were all variations on a theme of what I've done before.  Yesterday, however, I made some baseball cupcakes for a boys' birthday party at Yankee Stadium.  How FUN does that sound?!!  This was new design for me.  Pretty simple, and, of course, I had ideas how to improve on them them while I was in the process of putting them together so this will be a fun project to do again.

I've made (and posted about) Red Velvet Cupcakes...and I still SWEAR by the recipe I use.  It's absolutely delicious and has been an overwhelming success every time.  The color is such a lovely, deep red which an amazing hint-of-chocolate taste.  The Cream Cheese Frosting I usually top it off with is incredible, too.  In fact, it's often the star of the Red Velvet Cupcakes - such a winning combination (you can find the recipe here).  However, in this case I was asked to make a barely sweet icing so I decided to go with something a little different - Mascarpone Frosting.  I made the Mascarpone version for Tiramisu Cupcakes I baked a few weeks ago.  With only 1/2 cup of sugar I thought it could be a wonderful compliment to red velvet.  Turns out, I was right!

Okay, so here's how you make the cupcakes:

Sprinkles Copycat Red Velvet Cupcakes
Followed to a "T" from Carrot Top Mom

2 1/2 cups flour (I used all-purpose)
1/2 cup unsweetened cocoa (not Dutch processed)
1 teaspoon baking soda
1/2 teaspoon salt
1 cup butter, softened
2 1/4 cups sugar
4 eggs
1 cup sour cream
1/2 cup buttermilk (or milk with 2 teaspoons lemon juice)
1 ounce red food coloring
4 teaspoons pure vanilla extract

Preheat oven to 350 degrees.  Prepare baking pans with cupcake liners.  Set aside.

In a medium bowl, whisk together flour, cocoa, baking soda and salt.  Set aside.

In separate bowl, beat butter and sugar using electric mixer until light and fluffy (about 3 minutes).  Beat in eggs one at a time.  Add sour cream and milk, beating until well combined.  Lastly, add vanilla extract and red food coloring.

In three increments, add flour mixture.  Beat until just combined, do not overbeat.  Fill cupcake liners 2/3 full.  Bake for 15 minutes, or until an inserted toothpick come out clean.  Let cool for 15 minutes and remove from pan.  Let cupcakes cool completely before frosting.


Adding red dye to creamed ingredients

Red color of creamed ingredients with red dye

Slightly brownish red color of combined creamed and dry ingredients

The Mascarpone Frosting could NOT be easier to make:

Mascarpone Frosting

1 cup heavy whipping cream
8 oz.  Mascarpone Cheese
1/2 cup confectioners sugar

Using an electric mixer, whip heavy cream until if forms stiff peaks (about 5 minutes).

Add cream to the bowl

After 1 minute of mixing

After 2 minutes of mixing

After 3 minutes of mixing

After 4 minutes of mixing

After 5 minutes of mixing

Consistency thick enough to not fall off of spatula

In a separate bowl, beat together mascarpone cheese and sugar.  Once they are completely combined, add whipped cream incrementally:

Add in increments - I added in three

Finished Frosting

I frosted the cupcakes as smoothly as I could, letting them set a few minutes after the initial icing to "crust" a little bit.  Then I went over the rough spots once more.  It's not a silky smooth icing.  It's really ideal for piping rather than smoothing, so it's not going to look perfect.  Once they were all frosted I used the red buttercream icing and piped half moons on each side of the cupcake with a #3 piping tip.


Next, I piped a "stitching" effect on the half circles.  This was a bit challenging, as the buttercream did not want to stick to the mascarpone icing.  I used a toothpick to coax everything into place.


They are playful and fun, but I am planning to experiment a bit more.  One thing I'd like to do is making the "stitching" "V's" a bit smaller.  I will use a smaller piping tip and make the buttercream icing a little less stiff so it will cooperate more.  I had some leftover cucpakes, which I piped some Mascarpone Icing onto and decorated with some red M&M Minis:


And then, like all good bakers do, I sampled one to make sure they were okay:


SSOOOOOO GOOD!!!!  A word of caution - if you use the Mascarpone Cheese icing, place the M&M's on at the very last minute.  The icing drained the candy color of it's red and by the next day they looked a stained mess!  Otherwise, the M&M's add a nice effect and a bit of sweetness to compliment the icing.  Anyway you make them you will love them!


Monday, April 23, 2012

You Can't Change A Zebra's Stripes...Unless You Take A Big Bite!


Later this year, my Husband and I are going to on a safari trip to Kenya.  I am so excited to see The Great Migration of animals since I've watched so many programs about it.  We are lucky enough to be going with some amazing people we met on our train tour in India, which makes it even more exciting!  I've been researching and thinking a lot about zebras and decided to bake something with their pattern. I spotted these cake pops on Pinterest (where else, ha ha ha) on Mom's Killer Cakes & Cookies and decided to attempt them.  I almost didn't think I could possibly pull it off, but I did!  They are very unstable in the stick-and-dip process and need to be handled with care, but if you have some patience (and I really don't, just to give you an idea that anything is possible!) and time it's doable.  :)

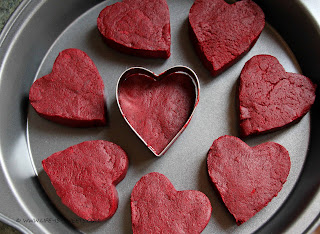
I'll explain what I mean.  To find instructions for putting together cake ball pops, click here.  Follow all of the steps up to the point you shape the cake into balls.  At that point, use a heart shaped cookie cutter and stuff the cake inside of it, filling it completely and smoothing out the top and bottom.  To remove the cake from the cutter, gently push the shape out onto a cookie sheet:


Refrigerate the hearts for about 2 hours or place in your freezer for 10 minutes.  I usually do the freezer method, but I've been having problems with the chocolate coating cracking, so this time I chilled them in the refrigerator and there was no cracking!  Definitely make certain they are nicely chilled before attempting to add the sticks.

I wish I had a third hand to take photos of putting the hearts on sticks and dipping, but with only two hands, I was not able.  I used the same method to stick them as ball shaped cake pops, but these were more difficult.  I had many casualties from putting the stick in to fast, to high inside the heart, not high enough, tapping too vigorously trying to remove excess chocolate, things along that line.

So, what I can tell you is this:  Dip the stick into melted chocolate, about an inch.  GENTLY and SLOWLY push the chocolate coated stick into the bottom of the heart.  Do not go further up than a little over half way.  Since the hearts are thinner in width than a cake ball, you can feel how the stick is going in and are able to control it from puncturing the outside.  In other words, make sure the stick is entering straight up.

The next problem is that the hearts are top heavy.  This makes is more difficult to dip into the chocolate.  When I started to dip, I could feel the pop was not very secure on the stick.  Through trial and error, I was finally able to dip and keep the hearts on the stick.  I'm trying to figure out a way to describe it, but I think you have to feel out while doing it.  Just go slowly, take your time.  Once the heart is covered in chocolate and sets until the chocolate is hardened, it will be very secure on the stick and you can proceed normally without worry it will fall off.

Next, take some of the leftover white chocolate from the dipping and, using CANDY COLOR DYE, dye it black.  I capitalized candy color because if you use icing dye, the water based dye will cause the chocolate to seize and it will be ruined.  You need to use Candy Dye, which is oil based.  If the chocolate has hardened, re-melt either in the microwave or a double boiler.  Again, click here for a review of the process.
Using a toothpick dipped into the black chocolate, randomly drag chocolate stripes across the heart.  It's been awhile since I've had a photo illustration in this post, so now would be a good time:


Voila!


And then the last step: Taste Testing!  Obviously.  ;)


These Zebra Stripe Cake Pops take some extra work and TLC to make, but the end result is adorable, isn't it?   I will definitely be making these again!!

Saturday, February 4, 2012

Red Velvet Cupakes with Cream Cheese Frosting


This is the second dessert I'd set to be automatically posted while I was on vacation, which did not post after all.  Oh, well, better late than never!  

This trip brought us to the Caribbean so we could take a break  to escape the icy temperatures in the Northeast.  We go on a cruise each January to spend a week in warm sunshine, which helps break up these cold months of lingering winter.  Since we've been doing this for many years we've had the opportunity to visit several different islands.  This trip, however, we only left the ship once in 9 days.  I had no phone, computer and never turned on the TV.  It was great to disconnect and just relax.  I read four books, slept, and seem to have finally beaten my never-ending cold.  But, I missed baking!!  I'm looking forward to trying some new recipes this week.


Before we left, I had to make Red Velvet Cupcakes for a customer order.  Again this brought up the issue of dense or light cake and hint of chocolate vs. obvious chocolate taste, which I wrote about in my Black Velvet Cupcakes post.  I can't tell you how many Red Velvet Recipes I went though, reading reviews, recipe alterations, debates.  In the end, I went with the cupcake described as moist and on the lighter side.  It is said to be a Sprinkles copycat recipe.  Recently, Sprinkles opened a shop in Manhattan, but I haven't gotten there yet.  When I do, I'll be able to compare.  I really loved these, though!

Sprinkles Copycat Red Velvet Cupcakes
Followed to a "T" from Carrot Top Mom


2 1/2 cups flour (I used all-purpose)
1/2 cup unsweetened cocoa (not Dutch processed)
1 teaspoon baking soda
1/2 teaspoon salt
1 cup butter, softened
2 1/4 cups sugar
4 eggs
1 cup sour cream
1/2 cup buttermilk (or milk with 2 teaspoons lemon juice)
1 ounce red food coloring
4 teaspoons pure vanilla extract

Preheat oven to 350 degrees F. Mix flour, cocoa powder, baking soda and salt in medium bowl. Set aside.

Beat butter and sugar in large bowl with electric mixer on medium speed 5 minutes or until light and fluffy. Beat in eggs, one at a time. Mix in sour cream, milk, food color and vanilla. Gradually beat in flour mixture on low speed until just blended. 


Do not overbeat. Spoon batter into 24 paper-lined muffin cups, filling each cup 2/3 full.


Vanilla Cream Cheese Frosting: With a high powered mixer (stand up mixer if you have one) beat cold cream cheese, butter, sour cream and Pure Vanilla Extract in large bowl until light and fluffy. Scrape bowl, and beat again. Gradually beat in confectioners’ sugar until smooth. Once smooth, turn beaters to high (I use my Kitchenaid) and whip on high for 5 minutes, until very fluffy. I am frequently asked how I get the piled high frosting. I do this with a piping bag, or a Ziploc bag with a 1 inch hole cut out of the corner will work perfectly. I always pipe the frosting on, instead of spreading it with a knife. That is how I get the tall pile of frosting. IF you do want the tall pile, I recommend doing 1 1/2 the recipe for frosting, to make sure you have enough.

Frost the cupcakes generously, and serve at room temperature! 


**Note from Carrot Top Mom:  In response to the comments who have had trouble with the frosting…These are the exact proportions I use. I do not add more sugar, or it will be very sweet, but it is important that the cream cheese and sour cream are cold. If the frosting is too runny, I recommend putting the frosting in the refrigerator for 20 minutes before piping it on. Also, your cupcakes MUST be totally cooled. The frosting may seem a little too moist at first, but if you can get it to form a pile, and leave the cupcake uncovered for 1 hour or so, it will form a slightly dry crust (not a bad crust, I promise), so it won’t seem so gooey.

Cream Cheese Frosting (This has been revised to show the cream cheese and butter cold, resulting in a less runny frosting.) If you want the piled high frosting, like the picture, make 1 1/2 the recipe of frosting and pipe it on with a piping bag or ziploc bag (do not try to spread it with a knife).
  • 1 (8 ounce) package cream cheese, cold
  • 1/4 cup butter, cold
  • 2 tablespoons sour cream
  • 2 teaspoons Pure Vanilla Extract
  • 16 ounces confectioners’ sugar
These cupcakes were as moist as promised!  The color is just gorgeous.  And the icing piled up just as it was supposed to!  Half way through frosting them I did put the icing back into the fridge to firm up a bit, then continued topping the remaining cupcakes.


I am not a huge fan of cream cheese frosting, but this recipe is great!  I had two taste tester friends give them a try in an exchange for an honest review.  While they do prefer a denser red velvet cake, the icing was an unqualified success!  They each had a second cupcake this morning, which is good sign (they even commented the icing was better the next day)!  I received a text from the Birthday Girl's sister (who ordered the cupcakes) and they raved about this recipe.  I highly recommend it!