
Later this year, my Husband and I are going to on a safari trip to Kenya. I am so excited to see The Great Migration of animals since I've watched so many programs about it. We are lucky enough to be going with some amazing people we met on our train tour in India, which makes it even more exciting! I've been researching and thinking a lot about zebras and decided to bake something with their pattern. I spotted these cake pops on Pinterest (where else, ha ha ha) on Mom's Killer Cakes & Cookies and decided to attempt them. I almost didn't think I could possibly pull it off, but I did! They are very unstable in the stick-and-dip process and need to be handled with care, but if you have some patience (and I really don't, just to give you an idea that anything is possible!) and time it's doable. :)
I'll explain what I mean. To find instructions for putting together cake ball pops, click here. Follow all of the steps up to the point you shape the cake into balls. At that point, use a heart shaped cookie cutter and stuff the cake inside of it, filling it completely and smoothing out the top and bottom. To remove the cake from the cutter, gently push the shape out onto a cookie sheet:
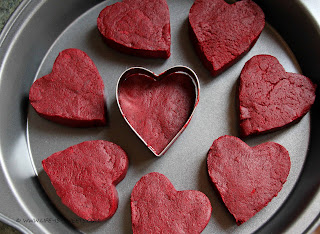
Refrigerate the hearts for about 2 hours or place in your freezer for 10 minutes. I usually do the freezer method, but I've been having problems with the chocolate coating cracking, so this time I chilled them in the refrigerator and there was no cracking! Definitely make certain they are nicely chilled before attempting to add the sticks.
I wish I had a third hand to take photos of putting the hearts on sticks and dipping, but with only two hands, I was not able. I used the same method to stick them as ball shaped cake pops, but these were more difficult. I had many casualties from putting the stick in to fast, to high inside the heart, not high enough, tapping too vigorously trying to remove excess chocolate, things along that line.
So, what I can tell you is this: Dip the stick into melted chocolate, about an inch. GENTLY and SLOWLY push the chocolate coated stick into the bottom of the heart. Do not go further up than a little over half way. Since the hearts are thinner in width than a cake ball, you can feel how the stick is going in and are able to control it from puncturing the outside. In other words, make sure the stick is entering straight up.
The next problem is that the hearts are top heavy. This makes is more difficult to dip into the chocolate. When I started to dip, I could feel the pop was not very secure on the stick. Through trial and error, I was finally able to dip and keep the hearts on the stick. I'm trying to figure out a way to describe it, but I think you have to feel out while doing it. Just go slowly, take your time. Once the heart is covered in chocolate and sets until the chocolate is hardened, it will be very secure on the stick and you can proceed normally without worry it will fall off.
Next, take some of the leftover white chocolate from the dipping and, using CANDY COLOR DYE, dye it black. I capitalized candy color because if you use icing dye, the water based dye will cause the chocolate to seize and it will be ruined. You need to use Candy Dye, which is oil based. If the chocolate has hardened, re-melt either in the microwave or a double boiler. Again, click here for a review of the process.
Using a toothpick dipped into the black chocolate, randomly drag chocolate stripes across the heart. It's been awhile since I've had a photo illustration in this post, so now would be a good time:


Voila!

And then the last step: Taste Testing! Obviously. ;)

These Zebra Stripe Cake Pops take some extra work and TLC to make, but the end result is adorable, isn't it? I will definitely be making these again!!


