Showing posts with label black. Show all posts

Wednesday, June 27, 2012

Moooooo-ve Over Other Sweet Treats, The Cows Are Coming Home!


I have been having a crazy-busy spring/summer season!  Lots of travelling and hosting guests who've come to tour NYC.  I've also been filling baking orders, but have been on such a time crunch I was never able to photograph and blog about them.  This time, however, I tried something new and decided to share my experience:  Fondant.

I have been afraid of fondant and dreading the day I had to use it.  Finally, that day came and I reluctantly purchased the necessary tools to make these cow cupcakes.  I have no idea when or how I developed the idea that fondant was a messy, sticky, difficult substance to work with, but I could not have been more wrong!  It's pliable, not terribly sticky, and FUN!!

These cutie cows were favors for a birthday party.  I was shown a picture to work from, and it was clear that the only way to accomplish this design was to use (in my opinion) the F-word.  Fondant.

Unfortunately, since I have family visiting from Buffalo, I was not able to photograph each step involved in putting these together.  I wanted to be efficient and still spend time with my guests.

To that end, I bought pre-made white, black and pink fondant from Michaels.  I also used candy eyes and black decorating gel for the snouts.

To begin, I rolled out the white fondant.  I made pretty thick discs and next time will make them thinner, since there's really no reason to use so much when topping a cupcake.

These are the tools I used to cut the shapes:


I used my graduated circle cookie cutters and matched the size of the head to the size of a cupcake.  Next, I used a smaller circle for the pink "snout" area.  After cutting the snout I used my fingers to press it onto the white head, forming it into an oval shape.  I used the smallest cutter from a "Fondant Flower" set from Michaels Craft Store to make the spots on the cow.  Certainly, you can make all kinds of different spot shapes, but I decided to be a little more uniform in the design, though I randomly placed them on the head so no two cows would be the same.  :)  The smallest circle cutter was for the ears.  I cut circles and then pinched the bottom of the circle together for a 3D ear effect.


I assembled them in this order:

  • Large circle head
  • Pink circle snout pressed onto the head
  • Black spots randomly placed on the head
  • Pressed in the eyes (which didn't stick very well, so I dabbed some black gel underneath them to act as a "glue".
  • I rolled bits of white fondant to make a "snake" sort of shape for the horns.  I placed them underneath the head and pressed the "forehead" area down into the horns to make them stick.
  • I rolled pink fondant on top of black fondant and then cut circle shapes with a cutter.  I pinched them into an ear shape and used the same "sticking" method as the horns to make them stick to the head.
  • Random smiles, smirks, and nose dots on the snout using the black gel.
  • I left them on a cookie sheet overnight to dry.

The next day I made vanilla cupcakes and vanilla buttercream icing.


I placed a dollop of buttercream on top of the cupcake and then pressed a cow on top:


And that's it!  The process took about 2 hours of rolling, cutting, shaping and placement.  I had fun doing it and can't wait to try some more new designs with my new friend, fondant!!  :)


Monday, April 23, 2012

You Can't Change A Zebra's Stripes...Unless You Take A Big Bite!


Later this year, my Husband and I are going to on a safari trip to Kenya.  I am so excited to see The Great Migration of animals since I've watched so many programs about it.  We are lucky enough to be going with some amazing people we met on our train tour in India, which makes it even more exciting!  I've been researching and thinking a lot about zebras and decided to bake something with their pattern. I spotted these cake pops on Pinterest (where else, ha ha ha) on Mom's Killer Cakes & Cookies and decided to attempt them.  I almost didn't think I could possibly pull it off, but I did!  They are very unstable in the stick-and-dip process and need to be handled with care, but if you have some patience (and I really don't, just to give you an idea that anything is possible!) and time it's doable.  :)

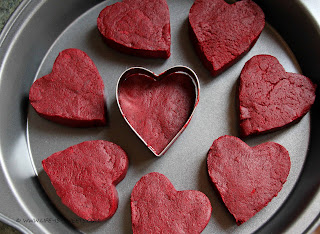
I'll explain what I mean.  To find instructions for putting together cake ball pops, click here.  Follow all of the steps up to the point you shape the cake into balls.  At that point, use a heart shaped cookie cutter and stuff the cake inside of it, filling it completely and smoothing out the top and bottom.  To remove the cake from the cutter, gently push the shape out onto a cookie sheet:


Refrigerate the hearts for about 2 hours or place in your freezer for 10 minutes.  I usually do the freezer method, but I've been having problems with the chocolate coating cracking, so this time I chilled them in the refrigerator and there was no cracking!  Definitely make certain they are nicely chilled before attempting to add the sticks.

I wish I had a third hand to take photos of putting the hearts on sticks and dipping, but with only two hands, I was not able.  I used the same method to stick them as ball shaped cake pops, but these were more difficult.  I had many casualties from putting the stick in to fast, to high inside the heart, not high enough, tapping too vigorously trying to remove excess chocolate, things along that line.

So, what I can tell you is this:  Dip the stick into melted chocolate, about an inch.  GENTLY and SLOWLY push the chocolate coated stick into the bottom of the heart.  Do not go further up than a little over half way.  Since the hearts are thinner in width than a cake ball, you can feel how the stick is going in and are able to control it from puncturing the outside.  In other words, make sure the stick is entering straight up.

The next problem is that the hearts are top heavy.  This makes is more difficult to dip into the chocolate.  When I started to dip, I could feel the pop was not very secure on the stick.  Through trial and error, I was finally able to dip and keep the hearts on the stick.  I'm trying to figure out a way to describe it, but I think you have to feel out while doing it.  Just go slowly, take your time.  Once the heart is covered in chocolate and sets until the chocolate is hardened, it will be very secure on the stick and you can proceed normally without worry it will fall off.

Next, take some of the leftover white chocolate from the dipping and, using CANDY COLOR DYE, dye it black.  I capitalized candy color because if you use icing dye, the water based dye will cause the chocolate to seize and it will be ruined.  You need to use Candy Dye, which is oil based.  If the chocolate has hardened, re-melt either in the microwave or a double boiler.  Again, click here for a review of the process.
Using a toothpick dipped into the black chocolate, randomly drag chocolate stripes across the heart.  It's been awhile since I've had a photo illustration in this post, so now would be a good time:


Voila!


And then the last step: Taste Testing!  Obviously.  ;)


These Zebra Stripe Cake Pops take some extra work and TLC to make, but the end result is adorable, isn't it?   I will definitely be making these again!!

Saturday, January 7, 2012

Black Velvet Cupcakes - Take 2


So, I've been wanting to try Black Velvet Cupcakes again to make up for the last terrible result I had baking them.  At that time I was happy with the deep black color of the cake but they had a horrible "black dye" aftertaste.  Yuck.  They looked pretty, but that's not really the point of a cupcake now, is it?

In the meantime of trying again I've done quite a bit of reading up on "velvet" cakes and there seems to be many schools of thought on their taste and texture.  Some say there should be a hint of chocolate, while others insist there should be an obvious chocolate taste.  As for me, I would like deep chocolate flavor.  I guess it's personal preference.  With this recipe was very, very happy with the deep black color of the cakes.  AND, they did not have that horrible black dye aftertaste. 


Also, there seems to be difference of opinion whether or not velvet cakes should be light and airy or more on the dense side.  This is a more dense cake.  As I said, I really liked it, but I would also like to try a version with a lighter crumb for comparison.  Okay, so enough with my comments, here is the recipe!

Black Velvet Cupcakes
Adapted from Java Cupcakes

Makes approximately 12 cupcakes

4 tablespoons butter, softened
3/4 cup sugar
1 egg
1/4 cup unsweetened cocoa powder
1 1/2 tablespoons black food coloring
1 teaspoon vanilla extract
1/2 cup buttermilk
1 cup all-purpose flour
1/4 teaspoon salt
1/2 teaspoon baking soda
1 1/2 teaspoon distilled white vinegar

Preheat oven to 350 degrees. On medium speed cream together butter and sugar for about 3 minutes.  Turn mixer to high and add the egg.  Scrape down the bowl and beat until well incorporated.

In a separate bowl, mix together cocoa, vanilla and black food coloring until it forms a thick paste.  Add to the batter and mix until completely incorporated.  Scrape down the sides of the bowl to make sure it's completely combined.

Turn mixer to low and add half of the buttermilk.  Add half of the flour and mix.  Add the other half of the buttermilk while mixing on low.  Mix in remaining flour and beat on high until batter is smooth.

Turn mixer to low and add baking soda and white vinegar.  Mix on high for a few more minutes.  Fill cupcake liners 2/3 and bake for 20-25 minutes, or until a wooden skewer inserted in the center of the cupcakes comes out clean.

After cooling for 10 minutes in the pan, place cupcakes on a cooling rack to cool completely before frosting.

Since February will be here before we know it, I decided to dress up these cupcakes for Valentine's Day:


White Buttercream Icing with Edible Pink Hearts

Valentine's Day M&M's

Silver disco dust, very sparkly and pretty!

Pink and White Icing Swirl

Heart Cut-outs


I have shared this recipe with:

Days of Chalk and Chocolate

Cast Party Wednesday

Saturday, October 29, 2011

What, or Who is lurking in the Shadows?!


We are just a few days away from my favorite holiday - HALLOWEEN!  I love everything about it, the colors, the time of year, and, of course, the treats!  And I love breaking out my adorable Halloween measuring spoons!   :)


My first project is a cookie made with what is now my favorite cookie cutter ever!  I found this Nosferatu cutter at Sur La Table.  It is so creepy and a touch frightening looking, unusual for a cookie cutter.  Immediately I knew I had to have it.  This cookie did not disappoint.

I mixed up my favorite chocolate cookie dough recipe:

Chocolate Cut-Out Cookies
adapted from recipe found on Bake at 350

1 cup unsalted butter
1 cup sugar
1 egg
1 teaspoon vanilla
1/2 cup baking cocoa
1/2 teaspoon coarse salt
2 1/2 cups all-purpose flour

Preheat oven to 350 degrees. Whisk together the dry ingredients and set them aside. Cream together butter and sugar. Beat in the egg and vanilla. Combine the flour mixture a little at a time. Roll the dough onto a floured/cocoa-ed surface. Cut out desired shapes with selected cookie cutters. Freeze cut-outs on cookie sheet for 5 minutes before baking to ensure baked cookies will keep their shape. Decorate with icing as desired.


Bake the cookies for 8-10 minutes and let them cool.  I stared long and hard at the cookie for decor ideas, but in the end I decided a solid, deep black would be best.  In my opinion, there's not much more to be done here to make this cooler looking.  Besides, aren't spooky, shadowy figures what Halloween is all about?!

I mixed together sifted confectioners sugar with a touch of water until the icing was the consistency I wanted.  I was going for a thicker icing so it would not flow over the edges of the cookie.  I used a #1 tip to outline Nosferatu.  Then I filled in the middle with more icing and used a toothpick to coax it to the edges being careful not to go over the outline.  This is quite a large cutter so I worked with two cookies at a time.

What fun Halloween treats will you be making this year? 


Celebrating Star Wars!


Last month George Lucas released the Star Wars Saga on Blu-ray.  This was a big day for the fans!  I'm a bit late in the game, but I had some Star Wars baking tools I wanted to experiment with in honor of my favorite Movie Trilogies!

First, I purchased a Star Wars cookie cutter set from Williams-Sonoma.  It 's an absolutely fantastic set, however I will need to spend more time figuring out how to ice them more appropriately, or if they should be iced at all.  I started with Darth Vader, as I wanted to use a chocolate cookie dough.  These cutters also are press cookies that make a crisp, indented image in the cut out.


The one pictured above is covered in flour so that I don't forget to tell you that you MUST dip the cutter in flour each time you cutout a cookie or dough will become stuck in the crevices and the shape will be unusable.  I learned this the hard way!  

So, you begin by mixing up chocolate cut-out cookie dough.  This is my favorite recipe:

Chocolate Cut-Out Cookies
adapted from recipe found on Bake at 350 (also my inspiration for these cookies!)

1 cup unsalted butter
1 cup sugar
1 egg
1 teaspoon vanilla
1/2 cup baking cocoa
1/2 teaspoon coarse salt
2 1/2 cups all-purpose flour

Preheat oven to 350 degrees. Whisk together the dry ingredients and set them aside. Cream together butter and sugar. Beat in the egg and vanilla. Combine the flour mixture a little at a time. Roll the dough onto a floured/cocoa-ed surface. Cut out desired shapes with selected cookie cutters. Freeze cut-outs on cookie sheet for 5 minutes before baking to ensure baked cookies will keep their shape. Decorate with icing as desired.

Next, roll out the dough and start cutting the shapes.  With the press cutters, once you have positioned the cutter and pressed it into the dough, you should press down again to create a nice, indented image on the cookie.  Be sure to roll and cut the cookies on a FLOURED surface (again, if you don't properly flour the cookie will stick to the rolling surface and become extremely difficult to remove, likely resulting in tearing the shape).

This is what you don't want (shape stuck to counter):


This is what you do want (shape lifted up with cutter):


To remove the cookie, push the press down, place cutout on a cookie sheet.  Do not worry about the white flour on the cookie, it will bake right in:


Once they are baked, you can decorate them after they've cooled.  I mixed up some black icing to pipe into the crevices of the cookie.  It was much more difficult than I expected.  I used very thick icing and a #1 tip, but it still spread into other parts of the cookie.  I began to get the hang of it, but between you and me I was glad I ran out of cookies to pipe!  


Now, moving on from frustrating to extremely frustrating:  Cupcake Stencils.  These were also purchased at Williams-Sonoma.  Of course, the box instructions make it look so easy.  The idea is that the stencils are curved to mimic the dome of a cupcake to ensure crisp lines and perfect images.  I tried, I really did.  Many times.  I re-frosted cupcakes and started over and over again.  The stencils would stick to the frosting making the design messy when lifting the stencil up.  The sugar would build up in the middle of the design and not cover the edges.  All sorts of problems.  I'm not used to not being able to  figure out a way to get something the way I would like it to be.  In this instance the stencils won and I was defeated.  I suppose the force was not with me.  I need further baking Jedi training and Yoda's calming influence!

One bit of advice, let the frosting set for a few minutes so the stencil won't stick as much.


This cupcake had been frosted and re-frosted so many times it became a bit messy.
I also made cupcakes with the rest of the stencils, too, just for "fun".  Here they are:


I'm not 100% sure I will try these again.  We'll see!  This is one of the instances I would have preferred not to post my baking project because I'm not happy with it.  However, I promised I would share the good and the bad.  It's all in the trying anyway!  Happy Baking.  :)

Monday, September 19, 2011

Black Velvet Cupcakes


A family friend of my Husband and mine is celebrating a birthday this week.  I wanted to use some of the edible glitter hearts I purchases and thought they'd look great with a black cupcake.  I was hoping for a sophisticated looking treat.  I do think I achieved the effect I was going for, but I have to admit the cupcake itself was not so tasty.  I am not even going to post the recipe because I cannot recommend anyone to make these themselves.  I'm not sure if it was the taste of the black dye, but this cake has a not-so-pleasant aftertaste.

I did find some adorable boxes to transport cupcakes.  I am thrilled to have a more attractive way of presenting my baked goods.  It's a shame these cupcakes don't taste very good, because they look wonderful!


I will tweak this recipe to make it more appetizing.  I love the idea of black cupcakes.  In the meantime, however, I am going to make some cute pink cherry chip cupcakes for our friend's special day.  I do want her to have a happy birthday, after all!


UPDATE:  I have since made delicious Black Velvet Cupcakes, which I have happily shared the recipe for!  Click here for the recipe!