Saturday, April 28, 2012

How Do I Love Tartufo? Let Me Count The Ways!


It's no big secret that my kryptonite is ice cream and gelato.  No matter how much I've eaten and how stuffed  I am, there is always room for ice cream.  A few years ago I discovered Tartufo, an amazing Italian dessert, and a few days ago I thought I'd give it a try myself.

In Italy tartufo has a double meaning.  It translates as "truffle"; both the "fruiting body of an underground mushroom" and a gelato dessert.  I'm obsessed with both.  Although the mushroom version may not sound appetizing by it's description (or their looks, for that matter),they have such a flavorful, distinctive taste that I can't get enough of!  A few years ago, while traveling around Italy with some friends we were lucky enough to visit Alba during it's Truffle Festival.


I almost passed out from happiness of being in truffle heaven!  We could not afford to buy any, but I did pick up some truffled honey and truffle salt.  To find out more about truffles and their interesting history, click here.  After all, they are not type of tartufo this post is about!!

So, let's get back on track with the ice cream.  Well, to be as authentic as possible, it should actually be gelato, if you can find it.  I was only able to locate vanilla gelato.  Ice cream is fine to use, as well.  You can use many different flavor combinations, but tartufo traditionally have a fruit/nut center or fruit juice in the center.  I was not about to try working with juice, the ice cream was more than enough to handle...finding the melted-yet-not-quite-melted temperature was a challenge.  So, I chose simple vanilla and chocolate gelato/ice cream with a maraschino cherry center.  It can have a chocolate coating, a crushed chocolate cookie/chopped chocolate coating, or even cinnamon or powdered cocoa.  My favorite is chocolate coating with a cherry center.  So that's where I started!


To start, here's a  Don't Do list:

1.  Don't let the ice cream become TOO soft.  I found it best to work while the ice cream was hard enough it was difficult to scoop and it made my wrist hurt a teeny tiny bit.

2.  Don't use a scooper that doesn't have a spring release.  I didn't the first two times and it was a mess trying to get the ice cream out of the scoop.

3.  Absolutely do not remove the filled-and-scooped ice cream from the freezer until it's completely hardened.  I found it was best to let it sit overnight.  If it's doesn't become firm enough you will get...you guessed it, a mess!

Let's begin:


Scoop your ice cream/gelato so you half of a ball.  Use a wooden spoon or some other object to poke a hole in the middle.  Don't go all the way down!  Fill it with whatever you have chosen.  I chopped up some cherries and mixed them with chopped chocolate bits and almonds.


Once you have added filling to the half scoop, round it out and "spackle" the hole with ice cream.  You can top off the scoop with the same flavor ice cream or you can add an additional one, as demonstrated in the photo below.  One scoop is all vanilla, one is chocolate AND vanilla, and the third is all chocolate (I'll get to the coating of the chocolate scoop in a moment).  Place them on a cookie sheet lined with parchment or waxed paper and place in the freezer until they are completely hardened.


The first of the two ways I chose to coat my tartufo is a hard chocolate shell.  Melt 4 squares of semi-sweet chocolate with 1 tablespoon of canola or vegetable oil.


For my first attempt I chilled the scoops for 4 hours.  I removed them from the freezer and placed them on a wire rack with waxed paper underneath.


Then I spooned the chocolate over the ice cream balls, trying to cover them completely.  This proved difficult, as it became apparent I hadn't had them in the freezer long enough.  They melted super quickly.  After the first coating, I placed them back in the freezer for about 20 minutes, removed them and coated again.  Back into the freezer they went for 15 minutes and then I picked them up and dipped the bottom of the scoops in the runoff melted chocolate on the waxed paper so they would be completely coated. 


Well, they turned out rather...uhm...ugly.


The insides looked like carnage!  Yuck.  


I decided to try them again...this time freezing the scoops overnight and using whole maraschino cherries.  So they wouldn't end up looking like this:


Well, this turned out MUCH better!  Exactly what I envisioned my tartufo to look like.  :)


Not only did I freeze them overnight before coating them, I added the chocolate shell in the morning and let them freeze until dinner time.  They were perfectly set to cut in half nicely:


And it tasted SO GOOD!!


The second type of coating I wanted to try was crushed chocolate wafer cookies with chopped milk chocolate bits.  I crushed the cookies in a plastic baggie using a rolling pin and added the chopped chocolate.


After freezing the maraschino cherry filled ice cream scoops, I placed them into the cookie/chocolate filled bag, one at a time, and rolled them around in the crumbs until they were fully coated:


After freezing them again for approximately 8 hours, I placed one on a bed of caramel:


Once again, absolute deliciousness!!!  I've read tartufo can be hard to find in restaurants in the United States.  I rarely see it on menus when eating out, but I'm not going to let that stop me from indulging in a good thing...I'll make them myself, and you should, too!!  :)

Monday, April 23, 2012

You Can't Change A Zebra's Stripes...Unless You Take A Big Bite!


Later this year, my Husband and I are going to on a safari trip to Kenya.  I am so excited to see The Great Migration of animals since I've watched so many programs about it.  We are lucky enough to be going with some amazing people we met on our train tour in India, which makes it even more exciting!  I've been researching and thinking a lot about zebras and decided to bake something with their pattern. I spotted these cake pops on Pinterest (where else, ha ha ha) on Mom's Killer Cakes & Cookies and decided to attempt them.  I almost didn't think I could possibly pull it off, but I did!  They are very unstable in the stick-and-dip process and need to be handled with care, but if you have some patience (and I really don't, just to give you an idea that anything is possible!) and time it's doable.  :)

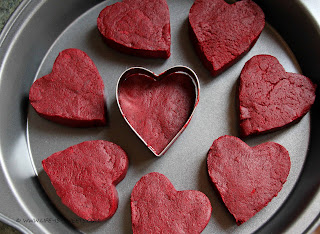
I'll explain what I mean.  To find instructions for putting together cake ball pops, click here.  Follow all of the steps up to the point you shape the cake into balls.  At that point, use a heart shaped cookie cutter and stuff the cake inside of it, filling it completely and smoothing out the top and bottom.  To remove the cake from the cutter, gently push the shape out onto a cookie sheet:


Refrigerate the hearts for about 2 hours or place in your freezer for 10 minutes.  I usually do the freezer method, but I've been having problems with the chocolate coating cracking, so this time I chilled them in the refrigerator and there was no cracking!  Definitely make certain they are nicely chilled before attempting to add the sticks.

I wish I had a third hand to take photos of putting the hearts on sticks and dipping, but with only two hands, I was not able.  I used the same method to stick them as ball shaped cake pops, but these were more difficult.  I had many casualties from putting the stick in to fast, to high inside the heart, not high enough, tapping too vigorously trying to remove excess chocolate, things along that line.

So, what I can tell you is this:  Dip the stick into melted chocolate, about an inch.  GENTLY and SLOWLY push the chocolate coated stick into the bottom of the heart.  Do not go further up than a little over half way.  Since the hearts are thinner in width than a cake ball, you can feel how the stick is going in and are able to control it from puncturing the outside.  In other words, make sure the stick is entering straight up.

The next problem is that the hearts are top heavy.  This makes is more difficult to dip into the chocolate.  When I started to dip, I could feel the pop was not very secure on the stick.  Through trial and error, I was finally able to dip and keep the hearts on the stick.  I'm trying to figure out a way to describe it, but I think you have to feel out while doing it.  Just go slowly, take your time.  Once the heart is covered in chocolate and sets until the chocolate is hardened, it will be very secure on the stick and you can proceed normally without worry it will fall off.

Next, take some of the leftover white chocolate from the dipping and, using CANDY COLOR DYE, dye it black.  I capitalized candy color because if you use icing dye, the water based dye will cause the chocolate to seize and it will be ruined.  You need to use Candy Dye, which is oil based.  If the chocolate has hardened, re-melt either in the microwave or a double boiler.  Again, click here for a review of the process.
Using a toothpick dipped into the black chocolate, randomly drag chocolate stripes across the heart.  It's been awhile since I've had a photo illustration in this post, so now would be a good time:


Voila!


And then the last step: Taste Testing!  Obviously.  ;)


These Zebra Stripe Cake Pops take some extra work and TLC to make, but the end result is adorable, isn't it?   I will definitely be making these again!!

Sunday, April 22, 2012

Brie Cheese and Cherry Jam Pastry Puffs


I don't know what the world is coming to....last week I posted a recipe for Honey Glazed Balsamic Vinegar Roasted Baby Carrots (SO  good!), and now a brie cheese appetizer.  I don't even like brie cheese.  Well, I don't like brie unless it's baked in these pastry puffs.  In this case, I LOVE brie cheese!  Anyway, I've made a bit of a departure from sweets, but these are worth it!

These couldn't be simpler to make (well, I guess they could if they were a one step baking recipe, but this is 3, so that's good enough for me to qualify as easy!) and they were a HUGE hit with the dinner guests I served  them to.

I started out very irritated because the puff pastry I thawed out stuck together.  Stuck as in wouldn't unfold. At.  All.


Eventually, I gave up and tried the second sheet.  I don't like being defeated by puff pastry, but I gave in when even my sous-chef cat Morticia became interminably bored and left the kitchen to engage in something more interesting that watching me struggle endlessly with something as silly as PUFF PASTRY.  Moving on....


Okay, so I unfolded the second sheet of puff pastry and assembled the ingredients.  The recipe I was following, from my new favorite blog (more on that later), Eat Yourself Skinny, said to use chives, but I could not find any in two stores so I used scallions:


1 sheet of Puff Pastry, thawed
24 one inch squares of Brie Cheese
Cherry Jam
Chives or Scallions
Chopped Pecans

To begin, preheat your oven to 375 degrees.  Next, cut the puff pastry into squares and place them in the bottom of each cavity of a muffin pan prepared with cooking spray.  Eat Yourself Skinny suggested cutting 24 squares, which I did, except I can't measure or count so I made them pretty small.  I will admit to never working with puff pastry before, so I thought they expanded in size.  They don't.  They puff UP, not out.  So, this means the size you cut the pastry will be the size you end up with.  They do not spread like cookies.  As a result, I ended up with brie bites.  They were perfect to pop in your mouth and exploded with flavor.  I'm getting ahead of myself, though.  So, place each square into a muffin pan.


Bake for 10 minutes and remove from oven.


Press the middle of the puff pastry down with the handle of a wooden spoon.  Bake puffs for 6-8 minutes longer or until they are golden brown if necessary:


Once they are golden brown, remove from oven and press center of pastry down again.  Fill the center of each puff with cherry jam, careful not to overfill.  The amount you use will be determined by the size of the pastry puff:


Place a square of brie on top of the jam and place pan back into oven for 3-5 minutes or until cheese begins to melt:


Immediately after removing puffs from the oven, garnish with chives or scallions and chopped pecans.  Serve them warm, but before you do sample one.  You will love it.  And how easy is this recipe?!  In 15-20 you will have an appetizer that impresses everyone.


Certainly you can use different flavor jams or types of chopped nuts, you can do a lot of experimenting with this recipe.  These are the bite sized ones I made:


My Husband loved them SO much and they disappeared so quickly I made more the next day using larger puff pastry squares in a two-bite size:


They were, of course, as delicious as the bite-sized ones.  So, let the occasion you are making them for guide what size pastry square you should cut and bake.  They look so pretty and not only make a great appetizer, but my Husband enjoyed them for breakfast the next morning!


Next month we are hosting a dinner party to celebrate a milestone in my husband's career and these are TOTALLY on the menu!!  Okay, now the reason I love Eat Yourself Skinny.  I discovered on the left sidebar of her blog she has recipes broken down into Weight Watcher points with a variety of  items from 0-9 points!  She has come up with some great recipes and did the hard work for those of us on plan!  These Brie Puffs are only TWO POINTS!!  For the breakdown of this and many more recipes, go to her site.  She's fabulous!!  In the meantime, bake these up and enjoy!  :)


Wednesday, April 18, 2012

Peanut Butter Chocolate - Chip Pound Cake with Peanut Butter Glaze


Pay attention folks, this is one recipe you should NOT miss!  I expected it to be delicious, but WOW, it's amazing!!  It's also totally not good for you, but you can pretend I didn't write that.

Okay, so I pinned this on Pinterest ages ago from Recipe Girl and I finally got around to making it.  I feel like I was in a cupcake rut and wanted to try something different.  I picked the right recipe with this one!!

I'm just going to get to it so you can start baking this ASAP, but it's going to be hard for me because I sent it all to work with my Husband so I wouldn't eat any more.  Yeah, guess what I've been craving all day!!

Peanut Butter - Chocolate Chip Pound Cake with Peanut Butter Glaze
Recipe by Recipe Girl

For the Cake:
3 cups all-purpose flour
1 teaspoon baking powder
1/2 teaspoon salt
1 cup creamy peanut butter (Recipe Girl advises against natural)
1/2 cup butter, at room temperature
3 cups granulated white sugar
6 large eggs
2 teaspoons vanilla extract
1 1/2 cups milk chocolate chips


For the Glaze:
1 1/2 cups confectioners sugar
1/4 cup milk
1/4 cup creamy peanut butter
1/2 teaspoon vanilla extract
1/4 cup milk chocolate chips for garnish


To begin, preheat oven to 325 degrees.  Spray a tube pan thoroughly with non-stick cooking spray, set aside.  Next, whisk together flour, baking powder and salt in a medium bowl.  Set aside.  In a large bowl, using an electric mixer, beat together peanut butter and butter until creamy.  Add granulated sugar and beat for an additional 5 minutes.


Add eggs and vanilla, beat until combined.  The batter will be thin.


Add the flour in increments (I did 4) to the batter.  It will thicken very quickly:


Pour the batter into the greased tube pan and tap it against the counter to make sure any air bubbles will pop.


Bake for 1 hour and 20 minutes.  Test with a wooden skewer to make sure it is fully baked (stick skewer into middle of the cake and if it comes out clean the cake is done.).  Remove cake from oven and let it cool in the pan for 20 minutes.  After removing the cake from the pan, let it cool completely before adding the glaze.


To make the glaze, whisk together the confectioner's sugar, peanut butter, milk and vanila extract until its combined.  The glaze needs to be thin enough to drizzle on the cake, so if it's too thick add a bit of milk a little at a time until desired consistency is reached.  Once the cake is cooled and glaze is whisked up, drizzle!  Garnish with additional chocolate chips.


I totally want this cake for dinner.  I'm so glad I sent it away, but not-so-secretly wish I saved myself a slice!  Anyway, a word of caution when making this cake.  I had to make it twice because the first one did not bake through all the way.  I removed the first attempt from the pan and left for an appointment while it finished cooling.  I noticed, when I returned, that it sank.  I ignored it and added the glaze and after it set I cut a nice slice for myself.  That's when I noticed the ring of uncooked dough all around my cake:


I used toothpick to check the cake and it came out clean, but I believe a toothpick is not long enough to give an accurate result.  The second attempt I used a skewer and after 1 hour 20 minutes it was not done, so I baked it for an additional 15 minutes and it was perfectly done.

But when I cut into the first cake, I'm not going to lie, I was devastated.  I wanted to eat a slice so badly I did the only thing I could do...I made it again.  So.  Worth.  It.

Now, if you like super dense, peanut buttery, chocolate accented, glazey goodness this cake is for you and I guarantee you will love it!!