Wednesday, October 5, 2011

Shortbread Cookie Topped with Caramel, Chocolate, and a dash of Sea Salt


My, that's a mouthful!  But that's what this decadent dessert consists of.  So, if you like the combination of salty and sweet and you have 5 sticks of butter just laying around, let's get baking!

I came across this particular recipe on Annie's Eats, a blog I am in love with.  She has amazing creativity and the best recipes.  It does take a bit of time to put these cookie bars together, but I must admit, they are pretty spectacular!  They contain all of the items found in a Twix bar, but they really taste nothing like that.  As Annie puts it, these are a more sophisticated, grown up version of the beloved candy bar.

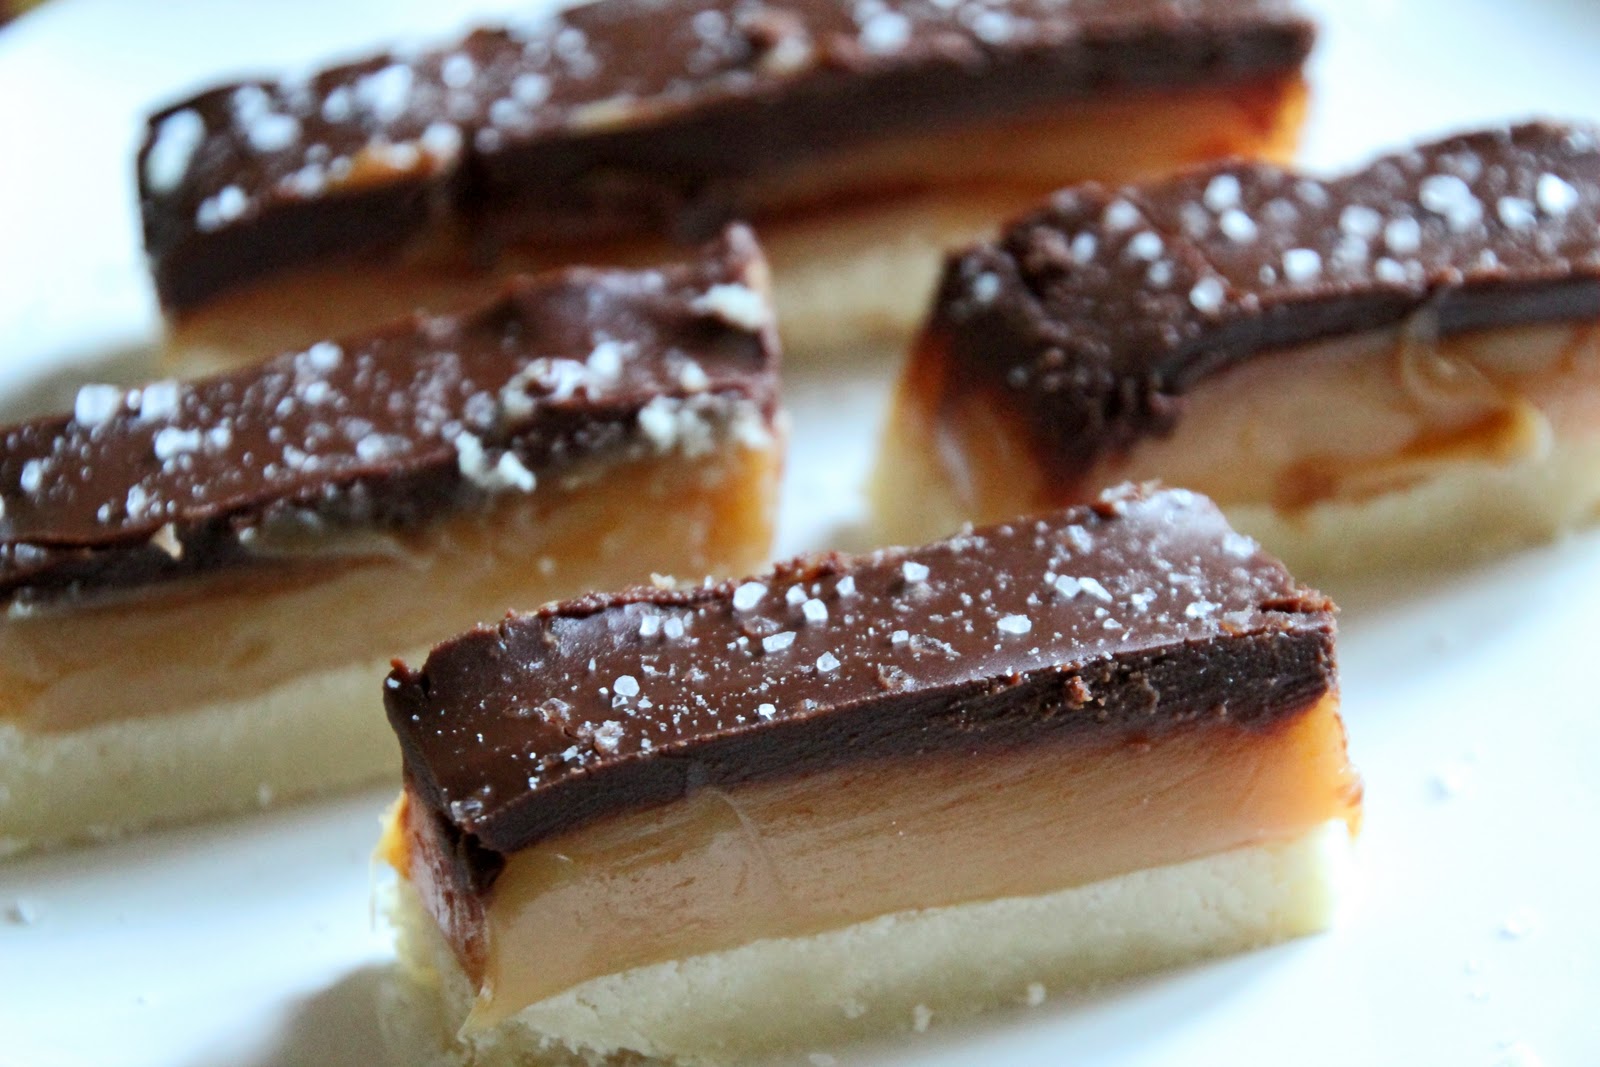
These bar cookies are made in three layers:  shortbread, caramel, and, chocolate.  To start, prepare the shortbread:

Shortbread

2 cups all-purpose flour
2 teaspoons baking powder
1/4 teaspoon salt
1 cup (2 sticks) unsalted butter at room temperature
1/2 cup of Sugar

Preheat your oven to 350 degrees.  Line a 9x13 pan with parchment paper.  Make sure to cover the sides of the pan with the paper so the layers don't stick.  In one bowl, stir together flour, baking soda and salt.  Set it aside.  In a separate bowl, cream together the butter and sugar with an electric mixer on medium.  Add the remaining ingredients and mix on low until all ingredients are incorporated.  Transfer mixture into the 9x13 pan and press it flat in an even layer.  Bake for 15-18 minutes or until golden.  If the shortbread raises while baking, gently flatten it as it cools.

I should have lined the pan with the parchment paper entirely.

While the shortbread cools, begin making the caramel:

Caramel

1 cup (2 sticks) unsalted butter, cut into pieces
1 cup sugar
4 tablespoons light corn syrup
2 cans sweetened condensed milk

Begin by adding the butter, sugar, corn syrup and condensed milk into a saucepan over medium heat.


Stir the ingredients occasionally until the butter is melted.  Increase the heat to medium-high until it begins to boil.


Decrease the heat to medium again.  As the mixture simmers, stir constantly so it does not burn.  Continue simmering and stirring until the color becomes a nice amber and the sauce has thickened a bit.


Now, pour it over the shortbread layer and spread evenly:


Let it cool thoroughly so the caramel does not melt when you add the hot chocolate mixture.  You can chill it in the refrigerator.  I just let mine sit for awhile and answered some emails before beginning the chocolate.  ;)

Melted Chocolate Glaze

8 ounces of semi-sweet or bittersweet chocolate chopped in small pieces
1 teaspoon light corn syrup
1/2 cup (one stick) unsalted butter, cut into pieces
Sea Salt to sprinkle on top

In a double boiler, add chocolate, corn syrup and butter.  If you don't have a double boiler, you can boil water on the stove top and place a heat proof bowl over simmering water, which is what I did.  Also, I used Ghiradelli semi-sweet chocolate chips rather than chopped chocolate.  It worked out just fine.  


Stir the mixture occasionally until it is melted smooth.


Pour the chocolate mixture over the caramel layer: 


Then use an off-set spatula to spread it evenly:


One last step, a few minutes after the chocolate sets, sprinkle some sea salt across the top.  I used a sea salt grinder.  The sweet/salty combination is amazing.  Cover and chill the pan of deliciousness, cut into bars when you are ready to serve it.  You can freeze what you don't use, which is advisable, as this is not a calorie friendly treat!  I think you'll love it, though.  Enjoy!


I shared this recipe with:

Cast Party Wednesday

Monday, October 3, 2011

Reese's Peanut Butter Pumpkins


Right off I'm going to say part of me wishes I didn't make these.  I have absolutely no self control around the holiday times when Reese's sells their peanut butter eggs, trees, hearts, and pumpkins.  It's a problem.  So, obviously I am taking a big risk learning how to make them in my own house.  But I did.  And they taste perfect.  And I'm sure I'm going to regret this day!

I found this recipe here and restrained myself as long as I could from giving it a try.  They are so simple you may or may not want to make them yourself.  It all depends on whether or not YOU have self control to stop at just one, or two, or....you get the idea.

Anyway, this is what you need:

Reese's Peanut Butter Pumpkins

1 cup creamy peanut butter (I used Reese's Peanut Butter)
1/4 cup melted butter
2 cups powdered sugar
1-2 tablespoons milk
1 1/2 cups of melting chocolate

Mix together the peanut butter, sugar and butter.  If the mixture is too thick, add the 1-2 tablespoons of milk.  The texture should be stiff but pliable, like Play-Doh.  Place the mixture onto a flat surface and spread evenly until is the thickness you desire.


Next, use a cookie cutter or mold your own shapes to dip into chocolate.  I did not have a small pumpkin cutter, so I used a small Christmas ornament cutter, which I then shaped into a pumpkin myself.  While I was at it, I cut out a few trees to see how they would look.


Also, I could not help but use my small Buffalo cookie cutter to make some Buffalo's.  I love representing my home!  Once you cut out your shapes (continue remolding the scraps until you have used all of the peanut butter mixture.  I also made some ball shapes to make a truffly version.), place them in the freezer for about 10-15 minutes.  Use a toothpick stuck in the side of your shape to dip them into melted chocolate.  I used Merkins melting milk chocolate wafers.  Melt them in a microwaveable bowl for 30 second intervals on Power Level 2 until all chocolate is melted smooth.


After letting the excess chocolate drip off, place the dipped shape onto waxed paper and remove the toothpick.  Dab a bit of chocolate onto the hole where the toothpick was.  I made the mistake of placing my shapes on a baking rack.  I do not advise this, as my shapes stuck to the rack and were not only difficult to remove, but also many of them tore.  The ones I placed on waxed paper had excess chocolate melted around the edges, but they came off the paper with no problem and held their shape wonderfully.


How GREAT are these??!!  And they taste so, so, so delicious!  Really, in a blindfolded taste test I would not be able to tell the difference between these and the real thing.  See, this is a problem.  Give them a try yourself, you won't regret it.  Or, you might!


Sunday, October 2, 2011

Heshey Kiss "Cutie Pies" and Cherry Pie Poppers

Hershey Kiss "Cutie Pies"


This past week I had quite a few requests to bake for different events.  Since I had actual orders to fill (and they were all items I had baked before so I didn't photograph them), I didn't have a lot of spare time to try new recipes.  On Friday, however, I had a few hours to experiment while waiting for a cake to cool.  Again, not a lot of time available, so it had to be something quick and easy.

I recalled a recipe for Hershey Kiss mini-pies I happened upon awhile ago, which fit the bill.  All that's needed is rolled out pie crust dough (either pre-made or homemade), Hershey Kisses, an egg wash (egg white whisked with a bit of water added), sugar, and some melted chocolate (if desired).  What could be simpler?

I began by unrolling out one of the pie crusts (take the dough out of the refrigerator ahead of time so it's room temperature) onto a floured surface.  Next, I unwrapped some Hershey Kisses and placed them on the dough.  I used a set of graduated circle cookie cutters, but you can just as easily use a knife to cut a circle around the Kiss.


Be sure the circle is large enough to wrap around the Kiss.  At first I cut out a circle that was a bit too small, making it difficult to wrap the dough around the top of the Kiss.  As I continued, I  cut out the circles using the next cutter size up.


To fold the dough over the Kiss bring the top and bottom part of the circle together over the top of the Kiss and seal it by pressing the dough together.  Then, do the same with the sides of the dough folded over the Kiss and sealed tightly.


After you have used up all of the pie crust dough (I re-rolled the scraps and continued making pie crust circles).  Brush some egg wash over the crust and sprinkle with granulated sugar, if desired.  Bake at 350 degrees for 18 minutes.


You can sprinkle confectioners sugar on top for some extra sweetness.  I did not, and after tasting one right out of the oven, I was not impressed.  The Kiss did not melt into gooey chocolate and, in my opinion, there was too much crust.  They weren't terrible, just not quite my taste.  Perhaps with some sugar added to the crust I would have preferred them.


I believed some improvement could be made, however, so I decided to melt a few chocolate wafers and drizzle the chocolate over the mini pies.  I was much happier with them!  Again, they are not overly sweet and chocolatey, but in some instances they can be the perfect thing to serve, such as an afternoon snack with coffee or tea.


I just love the Hershey Kiss shape in the middle when you bite into it.  So cute!!

UPDATE:  I changed my mind.  I tried one today with some tea and I actually loved it!!

Cherry Pie Poppers


I found myself with little more time and one more pie crust to use.  I didn't want to make any more Hershey Kiss mini-pies and I had a can of cherry pastry filling (which, looked essentially to be cherry pie filling with the cherries cut up into bits) in my pantry, so I decided to give cherry pie poppers a try.

I used two different sizes of circle cutters to make the pie crust dough circles - a larger one for the pie shell, and a smaller one to top the pie popper.  As with the Hershey Kiss pie, you can also use a knife to cut circles out.  Continue rolling out and cutting the dough scraps until you've used it all.  With one circle of pie crust I was able to make 12 pie poppers (using a mini-muffin baking pan).


I lined the mini-muffin pan with the crust circles and then spooned the pastry filling into them.


Next, I took the smaller circle of dough to cover the shell and filling.  Pinch the dough together to close the seam between the shell and the cover, just as you would with a full sized pie.


After each pie popper is covered and pinched together, use a knife to slash a line through the top of the pie popper crust:


Brush each pie popper with egg wash:


And bake for 19-20 minutes (or until golden brown) at 350 degrees.


Oh, they looked and SMELLED so delicious!!  I couldn't wait to try one, and they did not disappoint.  Another thing I love about these poppers is the portion control.  For me, two were quite satisfying, rather than eating an entire slice of pie.  This is good for those of us who are self-control challenged.


Obviously, I could use some work on pinching together seams, since these split.  Then again, I like the bit of color peaking through.  If I were wrapping these in treat bags the overflow would be a problem.  I suppose it will be a case-by-case decision!   Overall, I am very happy with them and can't wait for an opportunity to bake them again.

Some improvements for the next time:  I will add more filling to the pie crust shells.  This was my first time making these and I wasn't following a recipe or instructions, just kind of winging it.  I didn't know how much filling a pie popper would hold.  I could have used more.  Also, I think the placing of a bit of butter under the top crust (as I do with full sized cherry pies) will achieve a nice, buttery crust taste.  Lastly, in the future I will not be using canned cherry filling.  I much prefer my homemade sour cherry pie filling and will make that instead.


As for using pre-made pie crust, well, I am intimidated by making it from scratch.  I have been using pre-made pie crusts and that has worked out fine.  Since I've started to experiment with baking processes more, I think it's time to give pie crust a try.  My friend Karla promises me a tutorial, since she is known to be "pie crust Queen."  We'll see how that goes!

I'm excited to make these pie poppers in additional flavors, such as blueberry, pumpkin, chocolate, etc.  I'm so happy pie season is here!!!  Are you?


I have shared this recipe with:


Monday, September 26, 2011

Ice Cream Cones That Won't Melt In Your Hands!


I had some leftover cake pop mixture left over from last week and wanted to find something to do with it.  Of course,  I turned to Bakerella and found these amazing ice cream cone cake truffles.  I could not wait to give them a try myself!  Certainly they did not turn out nearly as perfect, but, as the title clearly states, I am a beginner and proud of my first attempt!

To start, you need some cake truffle mixture.  Click here for instructions to assemble it.  Next, find a box top  or something similar for a makeshift cone holder.  I used a candy box.  Taking a knife, I cut "X" shapes to set the cones into after dipping so the chocolate could set.


It is best to prepare this before assembling the cones so you are not stuck when you begin dipping.  Now, roll the cake mixture into balls and press into the cones.  Be somewhat firm so the balls will not fall out while dipping them into the chocolate.  Place them in the refrigerator for an hour or in the freezer for 10 minutes or so.


A few minutes before your pops have chilled and are ready to be dipped, begin melting the chocolate.  I used Wilton melting chocolate, which can be purchased at craft stores.  I heated them in the microwave for 30 second intervals on power level 2.  Repeat until the chocolate is completely melted and smooth.


Next, the dipping.  Coat the cake with chocolate and don't worry about imperfections, a bit of a rough texture creates more of an ice cream scoop effect and the drips look completely natural for ice cream.


I had to dip the white chocolate cones twice, because the chocolate cake showed through the coating.  I also made some pink ice cream cones, but I didn't like those as much.


Once the "ice cream" coating dried completely, I melted a small amount of chocolate to make "hot fudge" for the cones.  I melted a bit of red to make the cherries.  You can embellish the cones with sprinkles or jimmies, anything that suits you!

This is a more forgiving process than actual cake pops, since drips and drops actually work in the design, so you might want to give them try!


Summer may be over, but these ice cream cones will be a great treat all year 'round!  Enjoy.